Home » Fitting Instructions
Thank you for choosing a high quality KIWI SSB bearing.
If fitted correctly, this bearing will give twice the expected life of any Rubber type or fiber bearing.
#1: SSB bearings are machined to set standards meaning the OD and ID are based on a finished size to match a STD brass shell type rubber bearing OR they are custom machined to suit a given tolerance. So firstly ensure the bearing supplied is intended for the particular application.
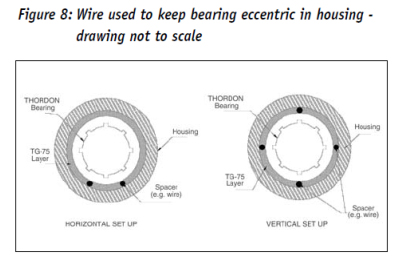
#2: the housing must be round in all planes before a standard bearing can be installed. If not special SSB bearings can be machined to the smallest housing tolerance and the bearing can be installed with suitable glue (see fitting instructions for bonded installation below). Please contact us for this option.
#3: The Housing must be clean and smooth.
#4: A standard SSB bearing can be fitted using a press in the workshop or freeze fit in the field. If a freeze fit we advise that the bearing should be placed in a freezer, bag of ice or dry ice for approx 2 hours. When removed from the coolant it can be simply installed with a rubber mallet or piece of wood across the back face and hammer. If the bearing becomes stuck simply use a threaded rod and nut to wind the bearing home. On larger bearings 8” shafts and above we recommend freeze fit with use of hydraulic rams. The bearing will always pull into the housing.
#5: do not use any form of lubricant to help install SSB bearing into housing as it can have a negative effect on the calculated interference fit.
#6: Standard SSB bearings up to 8” dia shafts do not require any mechanical lock e.g. Grub Screws etc – so don’t fit any!
#7: once installed the bearing should show a larger clearance than the standard rubber type bearing. We can provide the expected installed clearance on request.
#8: the larger installed clearance gives the SSB a significant advantage in water film / flow – remembering that it is this film of water that keeps the shaft central NOT the bearing material itself which will have very limited contact with your shaft.
The added clearance also significantly improves “flushing” which reduces wear, drag, friction and resistance with the added ability to absorb misalignment due to hull flex over the length of the drive train.
#9: If in doubt please ask one of our Thordon bearing specialists!
The bearing housing and Thordon material need to be properly prepared. Poor substrate preparation may result in loss of bond strength and the possibility of the bearings coming loose from their housings during the operation. The best preparation of the housing is to grit blast, but a good fastidious roughing up with P80 grit sandpaper will work.
NB Bonding should take place within 2 hours of surface preparation and cleaning. For Aluminium and Stainless Steel, reduce the exposure time to 30 minutes or less as an oxidation layer forms very quickly after sandblasting these materials. The surface to be bonded needs to be cleaned after abrading, with an organic solvent/degreaser such as universal thinners, or other equivalent non-residue degreaser, to remove any contamination before bonding. Allow the degreaser to evaporate completely. Do not touch the cleaned parts – if they need to be handled use new latex gloves to protect the clean surface from contamination caused by oil in the skin.
It is recommended that the bearing surface be wiped with a soft cloth wetted with a small amount of solvent. Allow solvent to completely dry before applying adhesive. Note that the bearing should not be soaked in solvent.
Use International Paints “Epiglue High Strength Epoxy Glue” or equivalent two pot epoxy.
Do not use adhesive below 10°C. Allow 24 hours cure time before immersion in water. Insufficient curing time, particularly at low temperatures prior to water immersion will result in reduced bond strength. Water will stop further curing of adhesive.